
Android Forensics Tutorial – Part 3 Data Acquisition Methods
Android Forensics Tutorial – Part 3 Data Acquisition Methods
In our previous Android Forensics Tutorial, we have learned about Directory structures of android and file system used by Android. Today we will learn about Android Data Acquisition Methods. So lets start third part of our forensics tutorial.
Data acquisition methods
Data acquisition is the process of extracting data from the evidence. As we discussed earlier, data acquisition on mobile devices is not as simple as standard hard drive forensic acquisition. These data acquisition techniques are broadly divided into the following types.

Data Acquisition Types
Android Forensics Tutorial : Data Acquisition
Manual Acquisition:
The examiner utilizes the user interface of the mobile device to investigate the content. While browsing the device, the examiner takes pictures of each screen. This method does not require any tools to perform data acquisition. Apart from the advantages, the biggest disadvantage of this method is that only data visible to the users on the phone can be recovered, and obviously it is time consuming.
Physical Acquisition:
Similar to physical acquisition process on standard digital forensics, physical acquisition process on mobile devices creates a bit-by-bit copy of an entire file system. It creates a copy of the entire file system which contains data present on a device, including the deleted data and unallocated space.
Logical Acquisition:
Logical extraction acquires information from the device using the original equipment manufacturer application programming interface for synchronizing the phone’s contents with a personal computer.
Most of the tools available for free perform Logical Acquisition. Logical Acquisition is the process of extracting data that is accessible to the users of the device and hence it cannot acquire deleted data or the data in unallocated space. The above statement has limitations in some cases.
Android Forensics Tutorial for Imaging an SD card with FTK Imager
FTK Imager can be downloaded from the following link. http://www.accessdata.com/support/product-downloads
It is important to get a bit by bit copy of the phone’s SD card, since it can be used as a valuable data treasure during investigations. As a best practice, we need to use a write blocker to maintain integrity of the evidence.
SD cards generally are of the FAT32 file system. So, we can use traditional imaging tools and acquire the image of the SD card. In this section, we are going to use a popular tool known as FTK Imager to get the image of the SD card.
Here are the steps:
- Safely remove the SD card from the mobile device and connect it to the workstation using a card reader.
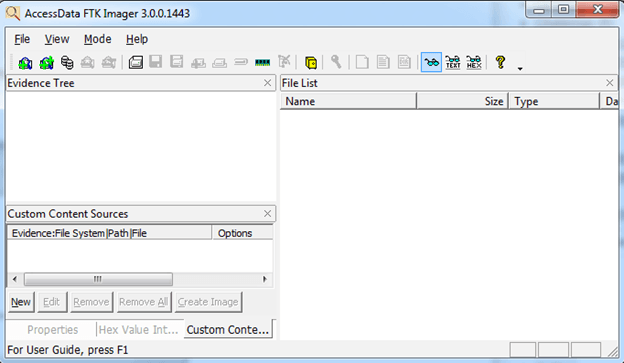
- Launch FTK Imager tool. This appears as shown in the figure below.
 3. Now, navigate to “File” and click “Create Disk Image” as shown below.
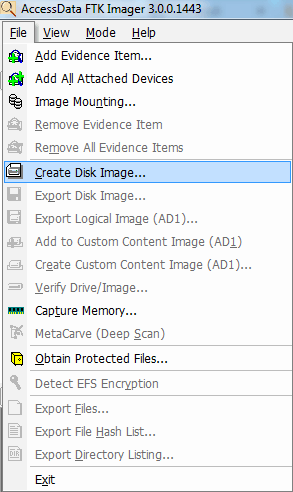
The above step opens a new window to select the type of acquisition.
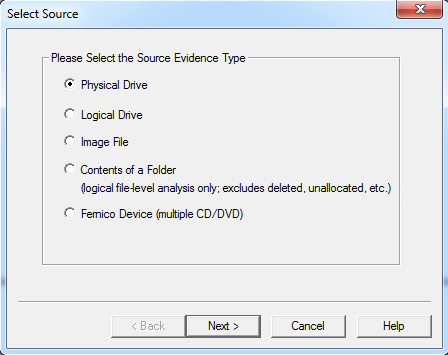
Since we are trying to create an image of the complete SD card, I have chosen “Physical Drive”. It opens a new window to select the Physical Drive as shown below.
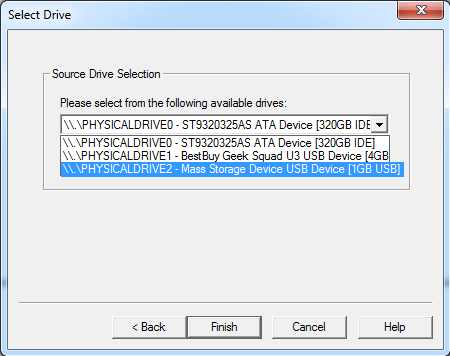
I have chosen “PHYSICALDRIVE 2″ of 1GB which in our case is the SD card. After selecting the appropriate option, click finish. It displays another window where we can add the destination as well as type of image to be created.
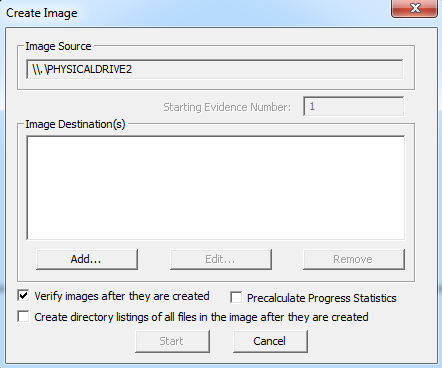
Upon clicking “Add” button, it opens a new window to select the destination image type.
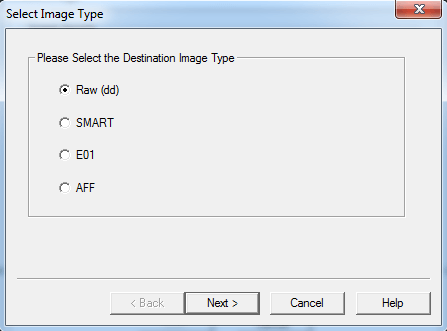
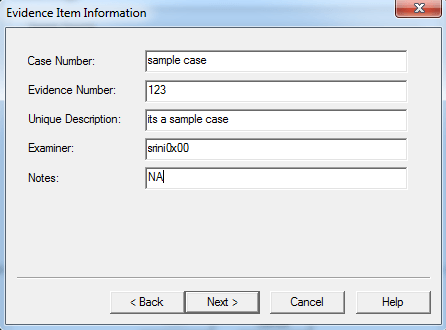
In our case, we choose “Raw” which gives a “dd” image. Unlike other image formats like “E01″, “dd” image will not store its metadata in the image. Upon clicking next, it shows another window where FTK Imager requests for Evidence Item Information. We can fill in the appropriate details and click “next” or skip it if we are doing it as a trail.
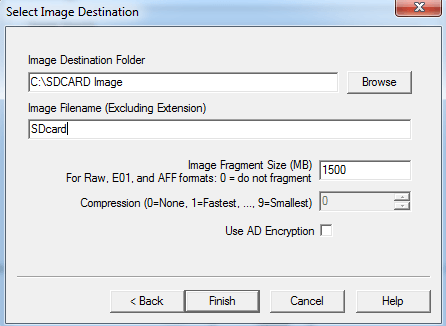
As we can see in the above figure, we have provided the destination path and name of the output file. Finally, click finish to start imaging.
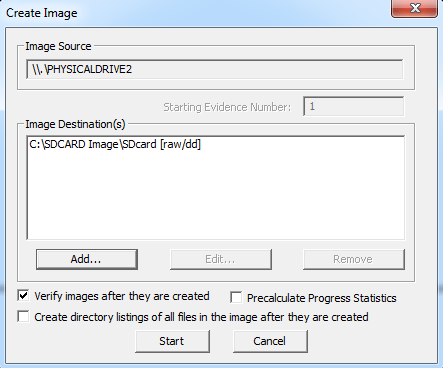
Click “start” to begin the process.
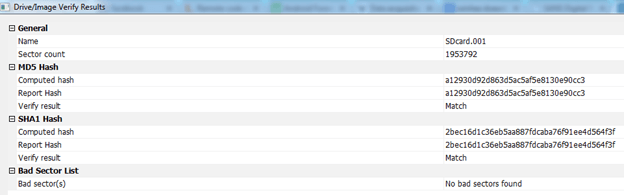
4. After finishing the process, FTK Imager displays a new window where it shows hash verification results. This is shown in the figure below.
Now, the created image can be further analyzed using traditional forensic analysis tools.
Imaging Android file system:
In this section, we will see how to perform data acquisition of Android file system partitions.
Note: in order to follow the below process, the device must be rooted.
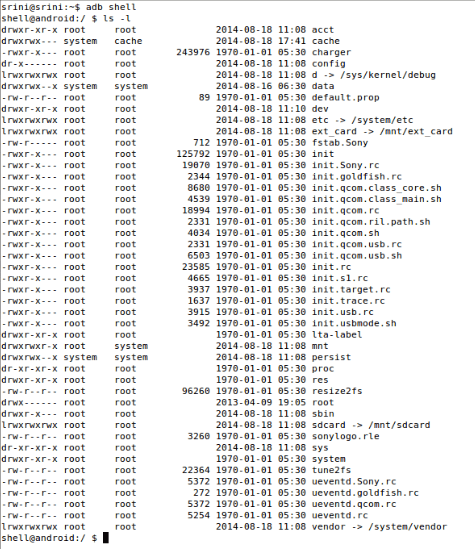
We will use the popular “dd” tool to do our job. “dd” is present in Android by default in “/system/bin” location. This is shown in the following figure.

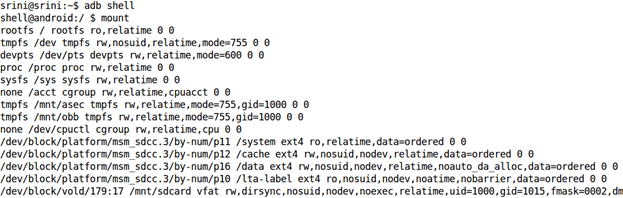
Now, let’s look at the partition locations of our interest using the mount command.
Following is the entry associated with “/data” partition from the above output.
Following is the entry associated with “/data” partition from the above output.
/dev/block/platform/msm_sdcc.3/by-num/p16 /data ext4 rw,nosuid,nodev,relatime,noauto_da_alloc,data=ordered 0 0
So, let’s use the following command to extract this particular partition using “dd“.
dd if=/dev/block/platform/msm_sdcc.3/by-num/p16 of=/mnt/sdcard/output.img
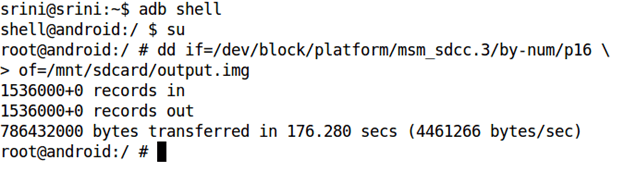
The above command is explained below.
if = input file
of = output file to be created
output.img = name of the output image to be created.
We can even specify the block size using the option “bs” in dd.
After finishing the above process, we can pull this file out using tools like Droid Explorer. We can even do it using the adb pull command.
The below screenshot shows the command to pull the image onto our workstation using the adb pull command.

Now, we can use this image to do our further analysis on the device.
That’s all friends. Hope you all have enjoyed android Forensics Tutorial on Data Acquisition Types. If you have any doubts feel free to contact us. Keep Learning !! Keep Connected!! Sharing is Caring!!
In our previous Android Forensics tutorial, we have learned about basic directory structure of android need for Android Forensics tutorial. In continuation of our chain of Android Forensics tutorial, today we will learn more about Android File System, how it can be helpful in Android Forensics.
Android File Systems
Having basic understanding for file systems is really helpful for basic any disk or OS forensics. Well for your information, android supports multiple file systems. But if we consider smartphones, then a very common terminology used is “YAFFS2 (Yet another Flash File System). It’s the main partition of Android file system and it’s specifically designed for embedded systems such as Smartphones, tablets etc.
If you want to see complete list of all supported file systems on an android device, you can use below command in “adb shell”:
“cat /proc/filesystems”
Above command will result into something like below :
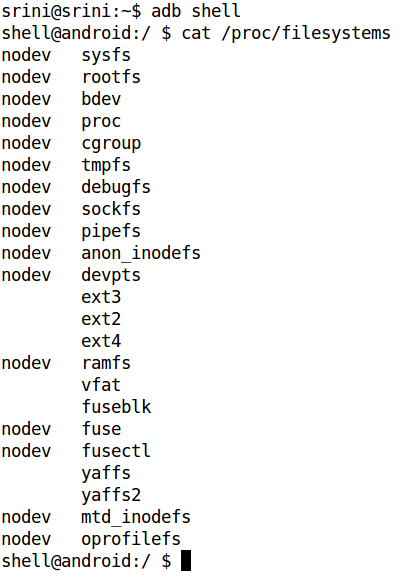
The “nodev” entry next to the file system indicates that there is no physical device associated with that particular file system. Android supports ext2, ext3, and ext4 file systems (used by Linux systems) and the vfat file system used by Windows-based systems. Since it is targeted for mobile devices, Android supports YAFFS and YAFFS2 file systems, since it requires supporting NAND chips used in these devices.
Android’s file system is divided into different partitions. In order to see the different partitions that are mounted on an Android device, we can get a shell on the device and execute the following command: “mount“. This is shown in the following figure:
If we observe the above figure, there are few important file system partitions such as /system, /cache, /data using ext4 as their file system type rather than YAFFS. This is because, starting from Gingerbread, Android has replaced YAFFS file system with ext4.
That’s all for today friends ! If you have any doubts feel free to ask.
We will learn more about Android Forensics in future articles. Keep Learning!! Keep Connected!!
Android marketplace is growing multiple folds everyday, so the vulnerabilities, bugs and hacking activities associated with it. Today we will learn how to do Android Forensics tutorial from basics. This will be a series of tutorials. In this tutorial we will discuss Android directory structures. In later tutorials we will learn about android file systems, data acquisition, analysis, and various tools available for Android Data Extraction.
Android forensics is different from regular operating system or disk forensics because of various reasons. It supports multiple file systems which are specific to Android only. We may look for the following data on Android devices: SMS, MMS, emails, call logs, contacts, photos, calendars, notes, browser history, GPS locations, passwords, data stored on SD cards, etc.
So for extracting above mentioned data, it is important to understand file systems, directory structures, and how and where the data is stored on the devices before getting into actual forensics. So let’s start learning about Android Forensics…
Directory Structure of Android Operating System:
Android OS got its own directory structure which is specific to android only. We can look at android directory structure using “adb shell” or “DDMS” or something similar, there are lot of such small scripts in the market, you can easily find out using Google.
Note: Directory structure of Android can vary from device to device.
Below is sample directory structure of “SONY XPERIA E” device using “adb shell”:
The above screenshot shows different files and folders on device. Now we want to know about data and folder which matters most for forensic analysts. Below are some most important places a forensic expert has to look upon:
- /system (system directory where operating system code exists)
- /data (it contains user specific data basically profile specific like data stored by SMS or MMS application, we can also see executable files of all applications at location “/data/app” directory but it requires root privileges i.e. a user without rooted device can’t see content of this directory. I have more for your guys. “/data/data/[app_package]/” directory is a place where user data for that application resides. But due to security reasons, data in each directory cannot be accessed by other applications. But there are multiple ways of doing that also which we will learn in later tutorials.)
- /sdcard (it is basically used for external storage where images, music files etc are stored but in our case (i.e. sony xperia) it stands for internal storage. So you need to debug more about /sdcard and /ext_card directories.)
That was all about android directory structures. We will learn more about Android Forensics – Hacker’s Guide Part -2 tomorrow.
Keep Learning !! Keep Connected!!
Block WhatsApp photos from Gallery
Pictures that you receive on WhatsApp are automatically stored in your phone’s Gallery, exposing them to anyone who browses photos on your phone.
In iPhone, go to the phone’s Settings menu>>Privacy>>Photos>>and then uncheck it After that WhatsApp will restrict this.
For Android users it’s a bit complicated.
Using a file explorer app such as ES File Explorer,
Go to WhatsApp’s Images and Videos folders and create a file within each called .nomedia. This will stop Android Gallery app from scanning the folder.
If not download KeepSafe app from the play store and hide the selected pics and videos.
Restrict access to your profile picture
Set profile picture sharing to contacts only>>in the Privacy menu to restrict your WhatsApp profile photo from unknown users and the people who are not in your contacts.
Beware of WhatsApp scams
WhatsApp will never contact users through the app and does not send emails about chats, voice messages, payment, changes, photos, or videos, unless you contact their help and support.
Anyone offering a free subscription, claiming to be from WhatsApp or encouraging you to follow links in order to safeguard your account is definitely a scam and should not be trusted. These links could lead to websites that install malware and spyware or track your personal details.
Deactivate WhatsApp if you lose your phone
If you lose your smartphone, immediately activate WhatsApp with the same phone number on a different phone, with a replacement SIM.
One of the basic security measures that WhatsApp takes is that the app can only be used by one number on one device at a time, so by doing so you instantly block it from being used on your old phone. If that’s not possible, WhatsApp can also deactivate your account.

Keep the WhatsApp app locked
WhatsApp doesn’t offer a built-in password or pin, you can use third party apps like Messenger and Chat Lock, Lock for WhatsApp and Secure Chat if you use an Android phone. This will help you from exposing your private chats, photos and videos from others who steal your smartphone or take it from you.
Hide the ‘last seen’ timestamp
WhatsApp’s much disliked last seen feature can also be disabled, it could help prevent your stalker know what time you were last online.
You can disable or restrict who sees your ‘last seen’ time in WhatsApp’s Profile>> Privacy menu, in Android,
iOS, Windows or Blackberry. However, if you turn it off, you won’t be able to see other users’ ‘last seen’ times either.
Be careful of what you talk about
You should not share confidential information, addresses, phone numbers, email addresses, bank or credit card details, or passport or other identification details on WhatsApp.
A man in the middle attack could lead to this information being compromised. WhatsApp has introduced end-to-end encryption for its Android users but other platforms are still vulnerable.
That’s all for today! We will discuss more whatsapp tips and tricks in future articles.
About Gamemaker gafoor.2


No comments